Cloud providers are no longer just offering traditional x86-based servers, ARM-based servers are now becoming a serious alternative. And for good reason: they’re often far more cost-effective and power-efficient than their x86 counterparts. For instance, we found a provider offering a server with 16 virtual cores and 32 GB of RAM for just €30 per month. To be realistic, most providers charge between €100 and €200 per month for such a server. These more expensive servers usually have less customers on a single server, improving the real life performance. In this post, we’ll put one of these budget-friendly ARM servers to the test. Of course, similar results can be achieved with an Intel or AMD server. The goal is to set up a production-grade ShinyProxy environment, designed to host a single public app, and see how many concurrent users it can realistically handle. (And yes, the title probably gives a hint already!).
Although this post focuses on a specific use case, the same principles also apply when running multiple apps with authentication.
Server selection
The first step is to pick a cloud provider and order a server. Choose a datacenter that’s located close to your end users to minimize latency and improve performance. Most providers also allow you to resize your server later by adding more CPU or RAM, so you can start small and scale up as demand grows. Make sure the server comes with a public IP address, since there is no need for a load balancer in this setup.
When it comes to the operating system, you can use any Linux distribution you prefer. In this tutorial, we’ll use Ubuntu 24.04. Once your server is provisioned, the next step is to connect via SSH. Usually your cloud provider provides documentation that explains how to do this.
As a final prerequisite, you’ll need a domain name. This makes it easier to
access your server using a human-friendly address and is also necessary for
configuring TLS. You can use either a root domain (e.g. example.com) or a
subdomain (e.g. shinyproxy.example.com). In your domain’s DNS settings, create
an A record that points the domain or subdomain to your server’s public IP
address.
Installation
With the server up and running, the next step is to install the ShinyProxy Operator. This tool takes care of the ShinyProxy installation process as well as all the required side components, so you don’t have to manage them manually. For detailed instructions, follow the official documentation. For the best setup, make sure to enable TLS and the monitoring stack. At this point you should be able to login and start the demo app.
Inspecting the resource consumption of the app
With ShinyProxy deployed, you can deploy your app. Once again, the documentation contains everything you need to know. To keep things simple, you can build the Docker image on the server. For example, clone your Git repository with all your code on the server and build the image using Docker. This way, you don’t need a container registry. After you added the app to the ShinyProxy configuration, you can start it through ShinyProxy. In order to know how many concurrent users are supported by the server, it’s a good idea to first have a look at the resources consumed by the app. Start the app, perform some user actions and run the following command:
sudo docker stats
The output will be similar too:
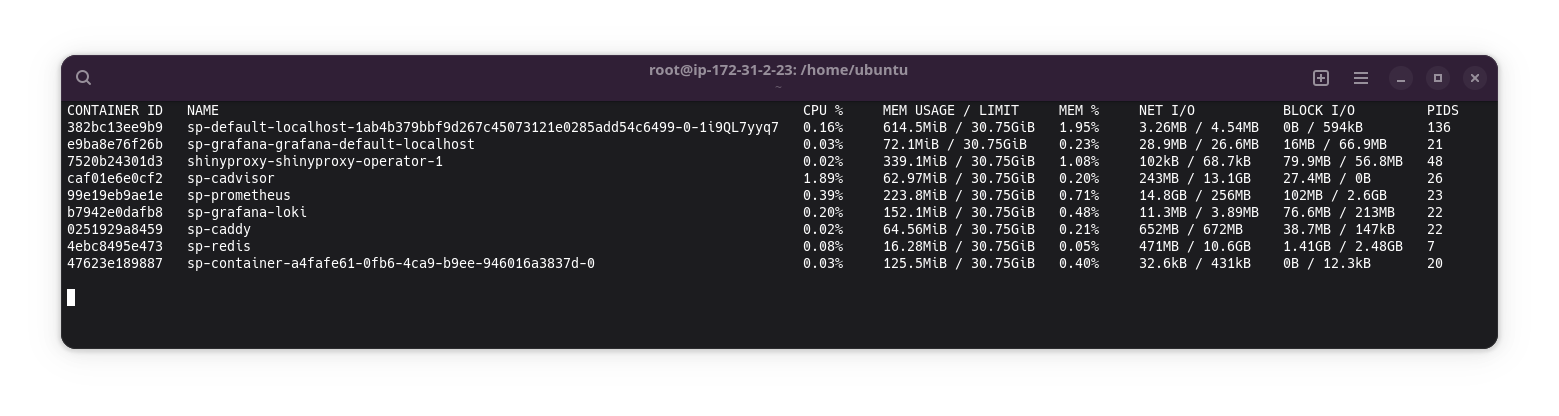
The last line in the screenshot shows the container running our Shiny app. It uses about 125 MiB of RAM and very little CPU time. Keep in mind that we’re working with a small demo app, CPU usage will increase if your app processes more data or performs heavier computations. Most Shiny apps typically use less than 500 MiB of RAM, but some can consume multiple gigabytes, especially when loading large datasets. To keep our example realistic, we’ll assume each app requires 500 MiB of RAM. The other system components (including ShinyProxy) also consume some memory. In the screenshot, these consume about 1.5 GiB. ShinyProxy generally requires up to 2 GiB of RAM. To avoid degrading server performance, it’s a good practice to leave a few gigabytes free. For this setup, we’ll reserve 4 GiB for ShinyProxy and the server itself, leaving 28 GiB available for the Shiny containers. With each container using 0.5 GiB, this allows us to run up to 56 containers concurrently.
Optimizing the configuration
Originally, ShinyProxy created a new container for each user. While this approach is simple and improves security, it’s not ideal for hosting a public app with many users. Fortunately, since quite some time, ShinyProxy has excellent support for what we call pre-initialization and container-sharing. With this feature, a single container can serve multiple users simultaneously. Since the containers are pre-initialized, loading times are minimal. However, each Shiny container still has a limit on the number of users it can handle. For simple dashboards, you can typically expect about 20 concurrent users per container. In our example, we’ll assume 10 concurrent users per container. Given our 56 containers, this setup allows the server to handle up to 560 concurrent users. To stay on the safe side and avoid overloading the server, we’ll round this down to 500 concurrent users.
With these numbers in mind, it’s time to adjust the configuration. Let’s start with the app configuration.
proxy:
  specs:
    - id: my-app
      container-image: openanalytics/shinyproxy-demo
      seats-per-container: 10
      max-total-instances: 500
      minimum-seats-available: 500
The seats-per-container: 10 setting tells ShinyProxy that each container can
handle 10 users or “seats”. To prevent overloading the server, we limit the
total number of concurrent users to 500 with the max-total-instances: 500
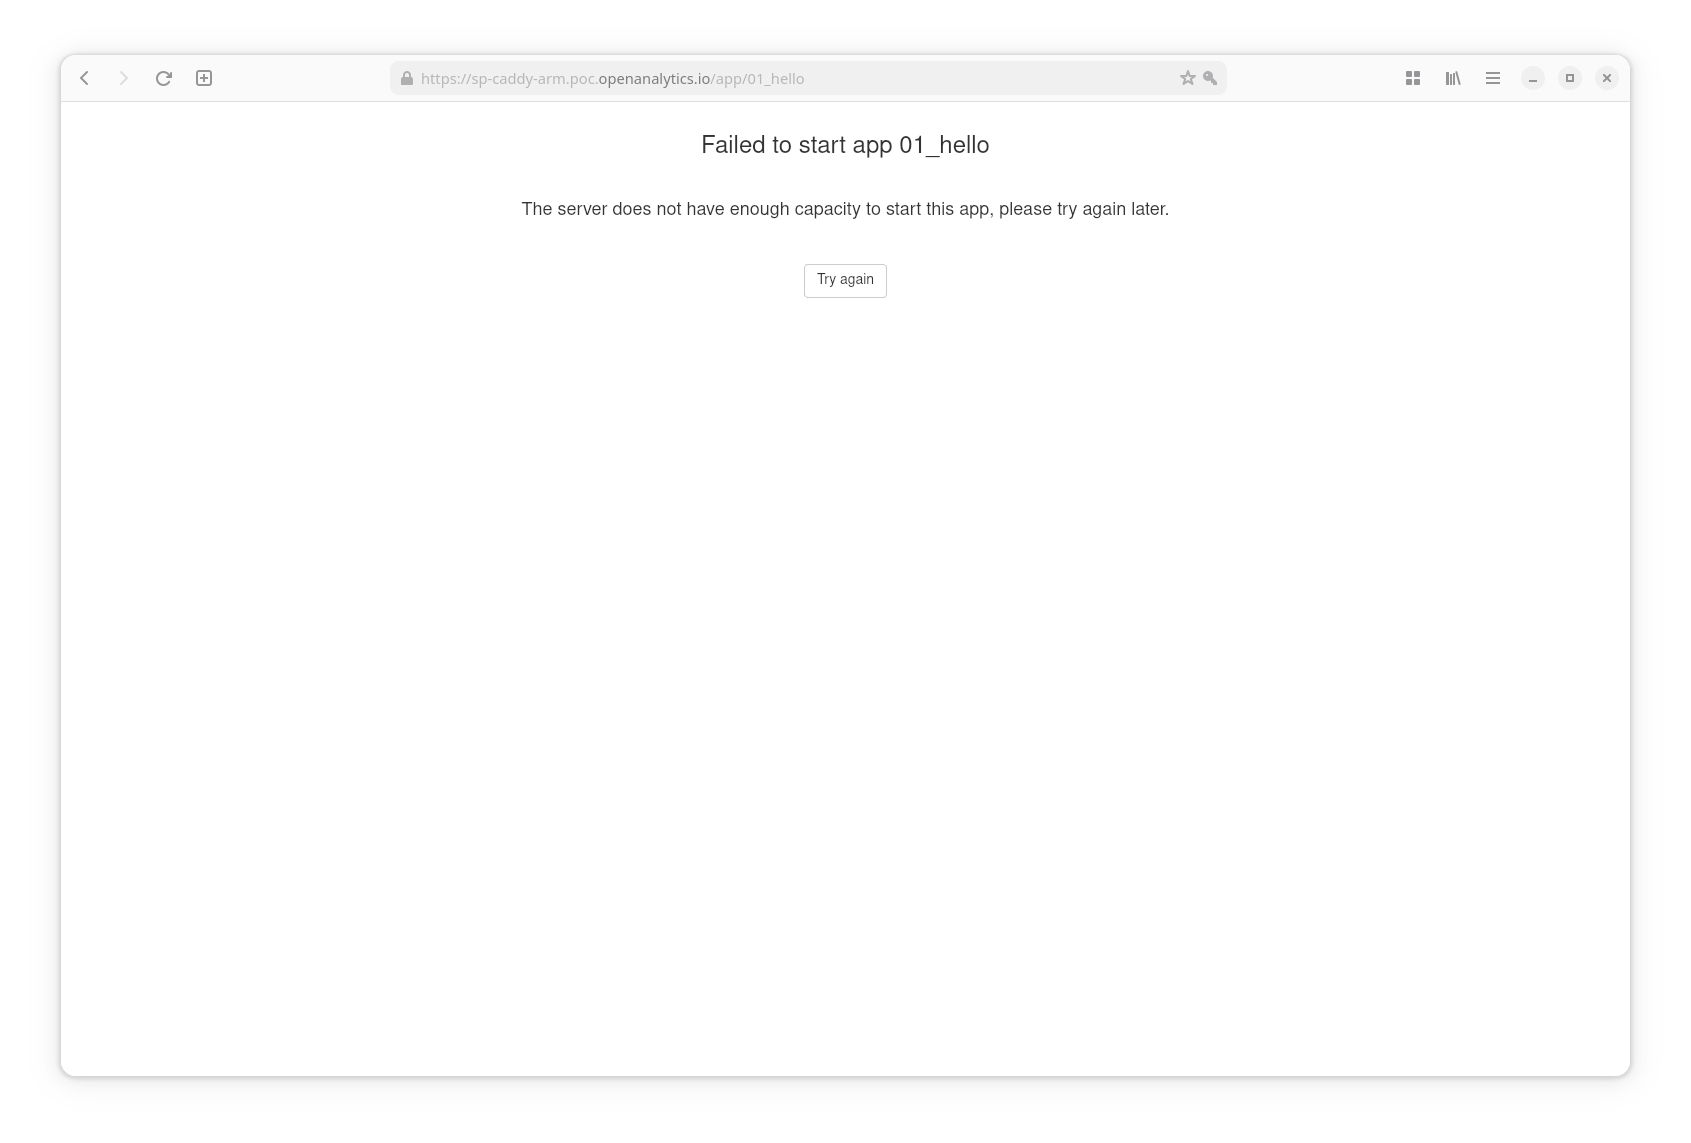
setting. If more than 500 users try to access the app at the same time, they
will see a message indicating that not enough capacity is available. Additionally, the
minimum-seats-available: 500 setting ensures that ShinyProxy pre-creates 50
containers and keeps them running, so users can start the app immediately
without waiting for containers to initialize.
In this example, we estimated the maximum number of concurrent users and limited the server to that value. Since we’re deploying only one app, it makes sense to create all containers at startup. However, if you are hosting multiple apps on a single server (which ShinyProxy fully supports), it’s better to start with just a few containers per app. ShinyProxy automatically creates new containers as users begin accessing the apps, ensuring resources are used efficiently.
While you are updating the configuration of ShinyProxy, add (or update) the following settings as well:
proxy:
  hide-navbar: true
  landing-page: SingleApp
  authentication: none
# ...
memory-limit: 2Gi
The first property hides the ShinyProxy navbar, which is often unnecessary when
hosting a single public app. By setting landing-page: SingleApp, users are
automatically redirected to the app when they visit the landing page. Since this
is a public app, we also disable authentication. Finally, we limit the memory
that ShinyProxy can use to ensure there is always enough RAM available for the
Shiny apps.
After updating the configuration, the operator creates a new ShinyProxy instance
with the updated settings. This process usually takes a few minutes. You might
see a “forbidden” page if you previously logged in using a username and
password. This happens only once when switching from authentication: simple to
authentication: none. To fix it, simply clear the ShinyProxy cookies in your
browser.
Testing the performance
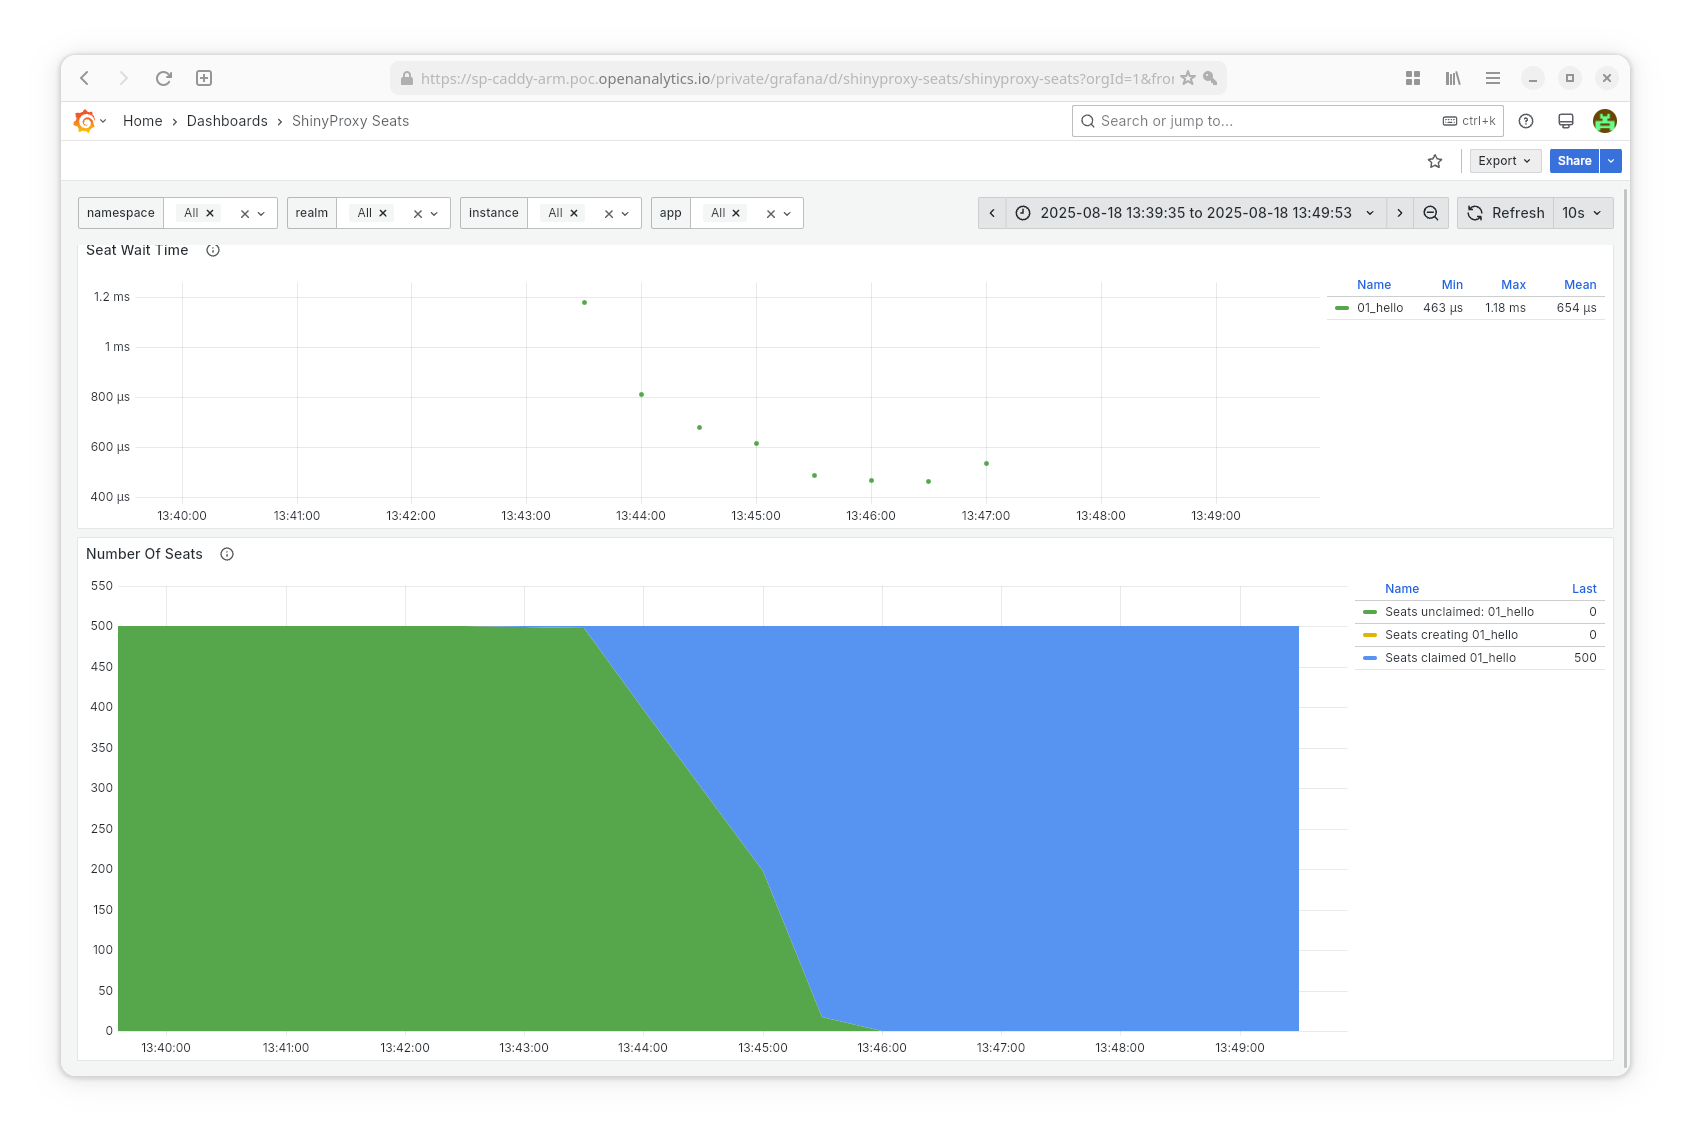
As soon as ShinyProxy starts, it creates 50 new containers. When you launch your app, it loads almost instantly, thanks to the pre-initialized containers. We tested this setup with 500 browser sessions, and the system handled them effortlessly. Both ShinyProxy and the Shiny app responded quickly, and the server load remained minimal. Of course, actual performance depends on the resource consumption of your app, but ShinyProxy is designed to manage these variations efficiently. The setup demonstrates that even a single ARM-based server can easily manage hundreds of concurrent users, delivering robust, production-grade performance.
The first panel in the screenshot shows how long users wait before being assigned a seat, and the second panel shows the number of available seats. When we launched 500 sessions within just two minutes, the available seats dropped quickly. Even so, loading times stayed at only a few milliseconds, which makes it clear that ShinyProxy remains highly responsive during a sudden surge of hundreds of new sessions.
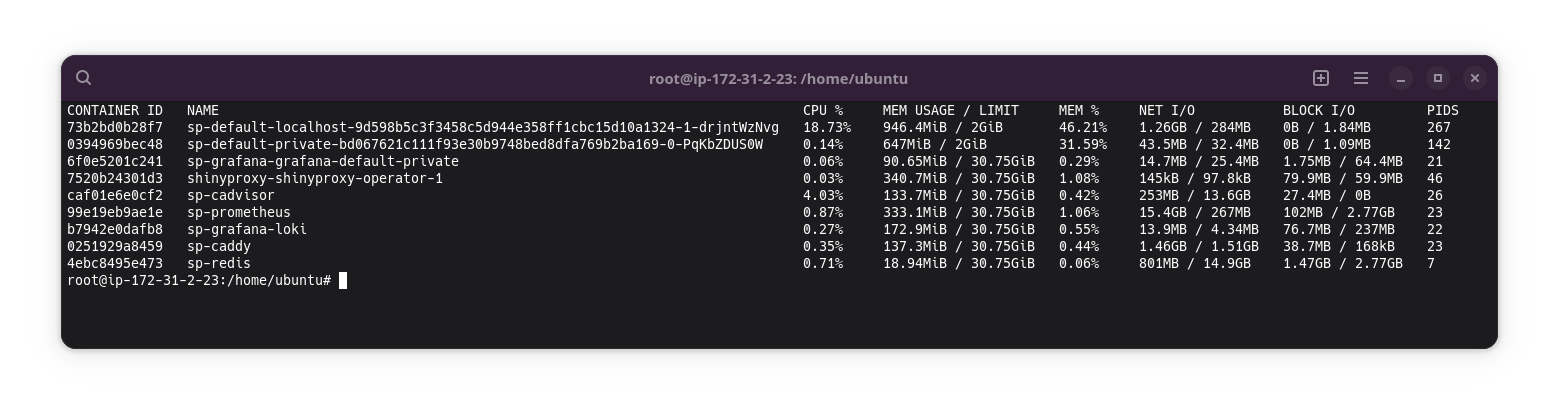
Once all apps are loaded, ShinyProxy’s CPU usage drops and remains low, as shown
by the docker stats output:
Monitoring
Although the monitoring stack was enabled when ShinyProxy was first deployed,
disabling authentication means that Grafana is no longer accessible through
ShinyProxy. A simple workaround is to deploy a second ShinyProxy instance that
still uses authentication. This private instance can also serve as a testing
environment for new development versions of your app before deploying them to
the public production server. To set this up, create a new configuration file in
the input directory, for example private.shinyproxy.yaml, and add the
following code:
server:
  servlet:
    context-path: /private
Be sure to update the proxy.realm-id, for example by setting it to private.
After deploying the server, you can access it at the same hostname as the main
server, but under the /private/ sub-path. For instance, if your server is
available at http://localhost/, the private instance is accessible at
http://localhost/private/, and Grafana at http://localhost/private/grafana/.
To view the logs and metrics of the public instance, you need to adjust the
namespace variable in the dashboards.
Conclusion
With the introduction of the ShinyProxy Operator for Docker, setting up a production-grade ShinyProxy server has never been easier. This post demonstrates that only minimal configuration is needed to handle a large number of concurrent users. Expensive servers or clusters aren’t required, just a single server is sufficient. If you need to support more users, simply scale up the server: in most cases, doubling CPU and RAM roughly doubles the number of concurrent users. Compared to the resource usage of the Shiny apps themselves, ShinyProxy consumes very little CPU and RAM, so it rarely becomes a bottleneck even under heavy load.
Don’t hesitate to send in questions or suggestions and have fun with ShinyProxy!